
(your login account information has been sent to you by email.)
Then click on Email Accounts.
Type your email address name and choose your domain name.
Enter and retype your email account password (or use the password generator
to help generate the email password.)
Your email password should be of 8 characters length, including numbers
and characters (better to have both capital and small letters).
Then set your quota for this email address. The default limit is 250MB.
2. Send/Receive Email in Outlook Express
create your email account in cPanel (i.e. complete step 1 above)
You may setup your Outlook Express setting automatically.
<Automatic Setting>
After login to your cPanel, at “Email Accounts"
choose your email address -> “More" button -> “Configure Email Client"
choose
Auto-Configure Microsoft® Outlook® Express® for IMAP Access
or
Auto-Configure Microsoft® Outlook® Express® for POP3 Access
<Manual Setting >
After login to your cPanel, at “Email Accounts"
choose your email address -> “More" button -> “Configure Email Client"
refer to “Manual Settings".
OR
At Outlook Express:
At Tools -> Accounts
Add ->Mail
Enter Your Name (e.g. John Chan)
Input Your Email Address (e.g. john.chan@yourdomain.com)
Input Incoming mail (POP3 server / IMAP server) as mail.yourdomain.com , and outgoing SMTP server
We suggest to use the SMTP server provided by your ISP (please refer to your ISP for the name of SMTP server).
You may also use our SMTP server : mail.yourdomain.com (server requires
authentication) port 26
Account name is your full email address. Password is what you have given
when you create the email account.
Now it is done.
3. Send/Receive Email in Windows Live Mail
Manual Settings
Mail Server Username: your email address
Incoming Mail Server: mail.yourdomain.com
Outgoing Mail Server: mail.yourdomain.com (server requires authentication)
port 26
Supported Incoming Mail Protocols: POP3, POP3S (SSL/TLS), IMAP, IMAPS (SSL/TLS)
Supported Outgoing Mail Protocols: SMTP, SMTPS (SSL/TLS)
Outgoing Mail Server: mail.yourdomain.com (server requires authentication)
port 26
Supported Incoming Mail Protocols: POP3, POP3S (SSL/TLS), IMAP, IMAPS (SSL/TLS)
Supported Outgoing Mail Protocols: SMTP, SMTPS (SSL/TLS)
At your Mac, login to your cPanel control panel,
At Email Accounts, create your email address (follow step 1 above) or at
your selected email address, click on “More” button → “Configure Email Client”
Select
Auto-Configure Mac® Mail.app® for IMAP Access
and follow the steps.
5. Send/Receive Email in Webmail
Webmail system allows you to send/receive your email at any computer using
your browser while connecting to internet anywhere.
You may either ,
or
-
go to your cPanel control panel, click on “Webmail”
then login using your email address name and email account password
then either click on “Horde” or “Squrriel Mail”
6. Send/Receive Email in iphone / iPad
You may read your email using your iphone / ipad.
At “Setting” → “Mail, Contacts, Calendars” → “Add Account
…” → “Other”
‘Add Mail Account’ → type your name, email address, password → Next → choose IMAP →
at Incoming Mail Server , type mail.yourdomain.com as Host Name , your email address as Username, and your password
at Outgoing Mail Server, type mail.yourdomain.com as Host Name , your email address as Username, and your password, then Next
After Verifying, at the Message “Cannot Verify Server Identity”, click “Details”
click “Accept” → “Save”.
Then your account is added. Your may go to Mail to send and receive your
email.
7. Send/Receive Email in Android phone / Galaxy Tab
At “Email” → click the top right corner → setting → Add Account →
type your email address and password → Next → choose IMAP → IMAP
server “mail.yourdomain.com” → Security Type (SSL Accept All Certificates) → port no. 993 → Next
Outgoing mail server “mail.yourdomain.com” → Security Type (No) → port
no. 26 → checked “requires authentication” → Username (your
email address) → Next
Set your frequency of mail checking (suggested no or per hour)
Done.
8. Send/Receive Email via Gmail / Yahoo Mail / Hotmail
You may send / receive email using common free mail system like Gmail / Yahoo Mail / Hotmail.
The setup needs to be done in your gmail / yahoo mail / hotmail account.
Please login to your gmail / yahoo mail / hotmail account, then at gmail /
yahoo mail / hotmail, go to settings, look for setup POP mail. You
need to pop your email into your gmail / yahoo mail / hotmail.
Your mail server should be set as “mail.yourdomain.com”
Then type your email address and password.
gmail / yahoo mail / hotmail using your own email address.
9. Setup Autoresponders / Vacation Message
Autoresponders allow you to preset a message to respond to your incoming email
automatically. You can use autoresponders to set a vacation message
during your vacation leave.
Login to your cPanel, at “Mail”, click on “Auto Responders”, then
click “Add Auto Responder”. Then follow the instructions.
10. Redirect My Emails / Send To Boss Email Monitoring
You can redirect and copy your incoming emails to other email address.
“Add Forwarder”. Then follow the instructions.
Mailing lists can simplify sending messages to a large group of people. You
can add a group of email addresses to a mailing list to avoid typing
those addresses each time you send a message.
Login to your cPanel, at “Mail”, click on “Mailing List”, then
create a mailing list and add the receipient in the mailing list.
12. What is POP3 / IMAP / SMTP ?
POP3 and IMAP are protocols to receive emails.
Using POP3 your emails will be downloaded to your computer / mobile phone /
pads. Emails will not be kept in server. So you need more space at
local device to keep your emails and the emails are not portable.
Using IMAP your emails will be kept in your server and can be accessed
using different device.
SMTP is the way for sending out email. You may choose to use your SMTP
provided by your Internet / Mobile Service Provider. Or you may use
SMTP at your mail server.
Just open a browser, type https://www.yourdomain.com:2083 at the URL
Then choose “accept the certificate" or “understand the risk" and go ahead
Your cPanel login account and password has been emailed to your registered
email address when your account is opened. You may email to
info@simple-website-hosting.com if you forget or lost your account
information email.
- File Manager to view, upload and download your files in your web hosting space.
- view how many space and traffic your web hosting account has used
- setup email accounts under your domain name
- setup FTP accounts for file upload and download
and many others
Login to your cPanel, at “Domains”, click on “Subdomains”.
Then type your subdomain and the subfolder where your subdomain refers to.
Login to your cPanel, at “Domains”, click on “Redirects”.
Then choose “Permanent / Temporary” redirect,
type the original URL and the destination URL.
And finally the prefix of your source URL to redirect.
Then click “Add”.
Login to your cPanel, at “Advanced”, click on “Error Pages”.
Choose and click your common error pages needed to edit :
400 bad request
401 authorisation required
403 Forbidden
404 Not Found
500 Internal Server Error
Your first page must be named as index.html or index.php
If you are familiar with html programming, you may create your webpages
using a common text editor.
You may also create your website using our RV Sitebuilder.
Just login to your cPanel control panel and click on “RVSitebuilder"
(near the bottom). Just create your website project -> choose
template -> create pages -> edit page using the WYSIWUG editor.
There are live video help to teach you how to do it.
You may also create your website using common tool such as Dreamweaver.
Just search “How to use Dreamweaver" in youtube and there
are many videos teaching you how to use Dreamweaver.
editor. Through Dreamweaver, you may connect and upload your webpage fles to your
website by FTP account.
You may search youtube.com for video help on how to use Dreamweaver.
DIY Sitebuilder
your project is ready, please click on Publish and choose to publish to
your domain name and/or subfolder under your domain name.
Registration and Transfer
register a .com / .net / .org domain, no document proof is needed.
Just
check your favorite domain name availability by click on “Checking
International .com / .net / .org Domain Name" at
http://www.simple-website-hosting.com/Search-Your-Domain-Name.php
Then,
click on “Join Now" to fill in our online form.
If
you want to register domain name only at this time without web
hosting, please leave the following option blank
|
Web |
Unlimited |
To
register a .hk local HK domain, HKID copy or BR copy is needed.
To
register a .com.hk local HK domain, BR copy is needed.
(Please
note full image is needed for documentary proof.)
Just
check your favorite domain name availability by click on “Checking Local .hk /
.com.hk Domain Name" at
http://www.simple-website-hosting.com/Search-Your-Domain-Name.php
Then,
click on “Join Now" to fill in our online form.
If
you want to register domain name only at this time without web
hosting, please leave the following option blank
|
Web |
Unlimited |
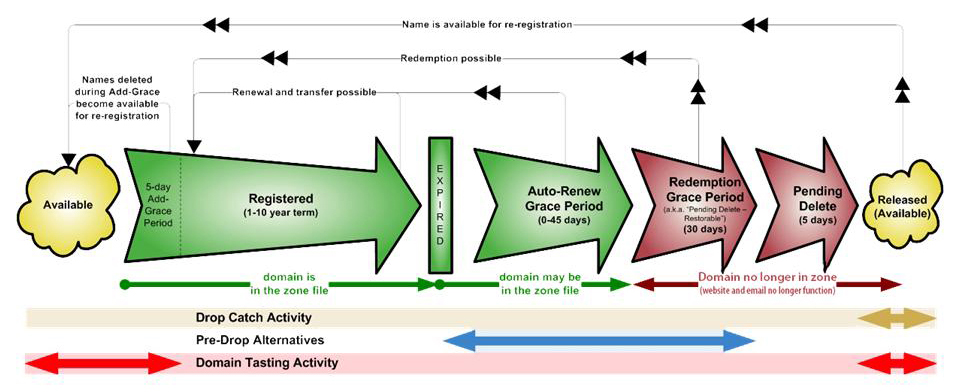
Your
domain name will undergo the following periods after expiry :
You
may either change to use our DNS or you need to modify your domain
name DNS to point to our web hosting servers.
Please
fill in our domain transfer form at :
You
need to
FTP
FTP
is used to upload / download files. It is the common way for file
transfer if your file size is too large that sending by email is not
possible.
FTP
can be used for uploading your website files from desktop machine to
your website. For example, if you have made your website files, then
you may use Filezilla to login (by using a FTP account) to upload
your files.
You
need a FTP account for connecting to your website if you are using
Dreamweaver to make up your website.
FTP
is also common for large file sharing. You may create a FTP account
for sharing files with other users / your customers.
Login
to your cPanel, at “Files”, click on “FTP Accounts”.
Type
your FTP account name, password and click “Create FTP Account”.
Although
internet browser such as IE / Firefox / Chrome can be used to login
your FTP account (at URL type ftp://ftp.yourdomain.com login : your
ftp account ), we suggest to download and use the free software
Filezilla (http://www.filezilla.org) which is more user-friendly.
Download
Filezilla from http://www.filezilla.org
Install and open Filezilla.
At Filezilla, login to your server at ftp.yourdomain.com
with your FTP account name and password.
Then you will see 2 windows, one is your local drive and the other your
server.
Go to your folders and drag and drop your files in-between your local
drive and server to upload and download files.
MySQL database is most commonly used for web and embedded applications to
support online functions such as online form, image gallery, blog,
online shop etc. MySQL database is provided in our web hosting plan
to support common PHP web programming. MySQL is a free open source
database management system; more information can be found athttp://www.mysql.com.
Login to your cPanel, at “Databases”, click on “MySQL Database Wizard”.
Type your new database name. Your database name will have a prefix as shown.
Click “Next Step”. Then create your MySQL database username and password.
Click “Create User”. Then check “ALL PRIVILEGES” → “Next Step”
Done.
You may manage (view, add, change, delete) your MySQL database tables
using PHPMyadmin which can be found at your cPanel control panel.
You may also browse, insert, update or delete your records.
As PHPMyadmin is the direct tool which you can use to manage your
records directly, please use it carefully and do not update / delete
your records accidentally.
Login to your cPanel, at “Files”, click on “Backup Wizard”
Click “Backup” and follow the steps to generate a full or partial
backup of your files and MySQL database.
To restore your website will overwrite your existing website files, so
you must be very sure about the need of restore.
To restore you need to have a backup in place.
Login to your cPanel, at “Files”, click on “Backup Wizard”
Click “Restore” and follow the steps to choose which backup copy you
want to restore.
Login to your cPanel, at “Files”, click on “Backup Wizard”
Click “Backup”, then choose “Select a Partial Backup”
Then choose “MySQL databases”
Login to your cPanel, at “Files”, click on “Backup Wizard”
Click “Restore”, then choose which MySQL database backup you want to
restore.